

by Diego Sanchez
March 07, 2018
Diego prevents carpal tunnel syndrome in designers worldwide by making incredible time-saving Photoshop actions and mock-ups.
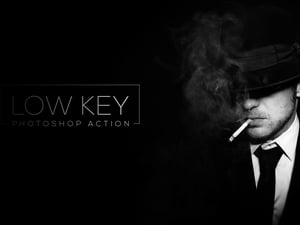


How to Create a Dark, Dramatic Photo Effect in Photoshop
Photoshop Effects
Want to darken a photo in Photoshop and give it a dramatic, broody feel? Get the best results by controlling the specific Lights and Shadows of your image, maintaining the ability to adjust the Brightness and Contrast while keeping the picture details. Because each image is different, you may have to change a bit the values from one picture to another, but this technique will let you adjust all settings for your particular image even after finishing this tutorial.
Before we start
If you want to follow this tutorial exactly as described, please download the following image from Pixabay.
Step 1
First, open your image in Photoshop.

Step 2
Go to Layer > Duplicate Layer and name this new layer as ‘Image Base’.

Step 3
Press ‘D’ on your keyboard in order to reset the Foreground and Background colors and go to Layer > New Adjustment Layer > Gradient Map. Name this layer as ‘Black and White’ and click OK. Be sure to have the Foreground to Background gradient selected in the Properties panel of the Gradient Map.
Note: If you do not have the default gradient selected, just click the down arrow next to the gradient and select the first available gradient (Foreground to Background).

Step 4
Go to Layer > New Adjustment L ayer > Curves. Name this layer as ‘Adjust Highlights’ and click OK.

Step 5
In the curves properties panel, click the curve to add an editing point, and set the Input value to 190 and the Output value to 225.

Step 6
Click over the layer mask thumbnail to make it active.

Step 7
Go to Image > Apply Image. From the dropdown menu of the Layer option select ‘Image Base’, set the Blending to Multiply, the Opacity to 100% and click OK.

Step 8
Go to Layer > New Adjustment Layer > Curves. Name this layer as ‘Adjust Shadows’ and click OK.

Step 9
In the curves properties panel, click the curve to add an editing point, and set the Input value to 70 and the Output value to 25.

Step 10
Click over the layer mask thumbnail to make it active.

Step 11
Go to Image > Apply Image. From the dropdown menu of the Layer option select ‘Image Base’, be sure to have the ‘Invert’ option checked, set the Blending to Multiply, the Opacity to 100% and click OK.

Step 12
Go to Layer > New Adjustment Layer > Brightness/Contrast. Name this layer as ‘Adjust Brightness and Contrast’ and click OK.

Step 13
In the Brightness/Contrast properties panel, set the Brightness to -100 and the Contrast to 60.

Step 14
Select the ‘Image Base’ layer and go to Layer > Duplicate Layer. Name this layer as ‘Details’ and click OK.

Step 15
Go to Layer > Arrange > Bring to Front.

Step 16
With the ‘Details’ layer selected, go to Filter > Other > High Pass. Set the Radius value to 0,8 pixels and click OK.

Step 17
Finally, the last step is to simply set the blending mode of the ‘Details’ layer to Linear Light.

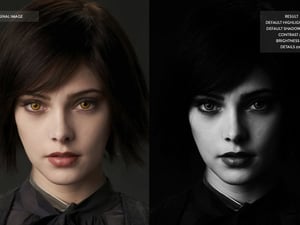
Before and After
Here is the Before and After image.


Final Notes
If you have used a different image to follow this tutorial, you probably need to change a bit the values showed here, because each image is different. Thanks to the technique we used, changing the values is a breeze. Simply go over each of the adjustment layers we did, and change the values according to your needs, there is no additional steps you need to make, just adjust the Highlights and Shadows Curves, and change the Brightness & Contrast to your liking.


Comments