

by Diego Sanchez
December 14, 2020
Diego prevents carpal tunnel syndrome in designers worldwide by making incredible time-saving Photoshop actions and mock-ups.
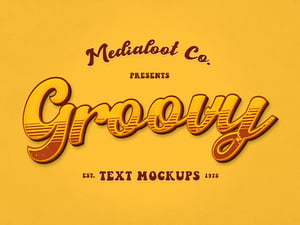

Make a 70s Text Effect in Illustrator
Illustrator Text Effects
When you think about making "text effects", your first thought is probably Photoshop. Makes sense, it is the first choice of many users around the world. But sometimes certain effects are so much easier to make in Illustrator and sometimes you don't even need to make any other adjustments in Photoshop. Today, I'll show you how easily you can make a 70's text effect in Illustrator with a non destructive process and we will even add a texture to it so you don't need to use Photoshop for the final touches.
But first, and if you want to follow this tutorial exactly as described, please download the following files:
Step 1
Open Illustrator and make a new file at any size you want. In this case i will make mine at 1800 x 1200 px.

Step 2
With the Type Tool (T) type your text. In this case, i will be using the Karimun font at 300 pt but you can use any font you want.

Step 3
With the text selected, go to Window > Appearance and click once over the "Add New Stroke" icon.

Step 4
Drag the Stroke layer below the Fill Layer in the Appearance Panel.

Step 5
Select the Fill layer and set the fill color to #fbf5d3.

Step 6
Select the Stroke layer. Set the stroke color to #e8ae52 and the size to 15 pt.

Step 7
With the stroke layer selected, click on the "Add New Effect" icon in the Appearance Panel and go to Distort & Transform > Transform. Apply the following settings and click OK.

Step 8
With the stroke layer selected, click on the "Duplicate Selected Item" icon in the Appearance Panel.

Step 9
Set the stroke color to #d36137.

Step 10
Click on "Transform" to edit the effect. Apply the following settings and click OK.

Step 11
Again, click on the "Duplicate Selected Item" icon in the Appearance Panel.

Step 12
Set the stroke color to #cd3930.

Step 13
Click on "Transform" to edit the effect. Apply the following settings and click OK.

Step 14
Again, click on the "Duplicate Selected Item" icon in the Appearance Panel.

Step 15
Set the stroke color to #932d47.

Step 16
Click on "Transform" to edit the effect. Apply the following settings and click OK.

Step 17
To make the effect more appealing, we will add a texture. But first, select the Rectangle Tool (M) and draw a rectangle covering the whole canvas using any color that you want. In this case, i will set up the color to #6b2826.

Step 18
Go to Object > Arrange > Send to Back.

Step 19
Select the Text and go to Window > Transparency.

Step 20
Click on "Make Mask" and uncheck the "Clip" option.

Step 21
Click once over the Opacity Mask thumbnail to make it active.

Step 22
Go to File > Place. Locate the "grunge-5.jpg" texture on your computer and click the Place button.

Step 23
Click and drag over the canvas to make the texture cover the whole text as shown.

Step 24
Lastly, click over the Stop Editing Opacity Mask thumbnail.


Comments