
by Diego Sanchez
May 27, 2019
Diego prevents carpal tunnel syndrome in designers worldwide by making incredible time-saving Photoshop actions and mock-ups.


How to Make a Desaturated Urban Look in Photoshop
Camera Raw in Photoshop
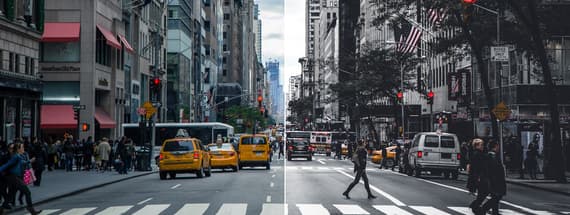
An effect that has become super popular on Instagram and other social platforms is a chill, cool-colored “Desaturated Urban” filter. There are of course many different types of “Desaturated Urban” looks (each author has his own touch), but today you will learn how you can create your own and give it your own particular style.
Rather than showing you how to make the effect in a single image with exact settings, i will show you the technique used behind this effect so you can apply it to any image you want to edit so you know which settings to change according to your own image to achieve this modern urban desaturated look.
But first, to make this tutorial easy to follow, go ahead and download this image from Pexels: Download
Step 1
Open your image in Photoshop.

Step 2
Go to Layer > Smart Objects > Convert to Smart Object.
Note: We only do this just in case you want to go back and change some settings after the effect has been applied.

Step 3
Go to Filter > Camera Raw Filter.

Step 4
Go to the HSL Adjustments tab and select the Saturation tab in order to desaturate the colors.

Step 5
Decrease all the colors values from the Oranges to the Purples (or all of them except the ones you want to keep) but try to make a smooth transition between them according to your image.

Step 6
Go to the Basic tab, and increase the Clarity to your liking. Clarity is very often used on the Desaturated Urban look, but still, is optional. In this case I will increase the Clarity value to +45, which seems to work just fine, but it is up to you how much Clarity you want to add.

Step 7
Next (and because is a daylight picture) increase the Highlights values as much as you want. I will increase it to around 80 so not too many details are lost.
Note: If this was a night shot, then you simply decrease the Highlight values a bit.

Step 8
Now go to the “Tone Curve” tab and select the “Point” tab under it.

Step 9
Make an “S” curve to fix the exposure and contrast. In this case I’ve setup 3 extra curve points as shown.

Step 10
To lift the blacks, simply click and drag the bottom left anchor point up a bit. In this case, reaching an output value of 30 will be just fine, but you can set any values that works best for your own image.

Step 11
This effect usually have a blue touch on the shadows. Although is an optional step, if you want to use it select the Blue Channel in the Channel dropdown and lift the bottom left anchor point a bit. In this case, I will set it to an Output value of 5 for a subtle blue touch.

Step 12
If you plan to use this effect on various pictures, a good idea is to save it as a preset. To do that, simply go to the Presets tab and click on the “New Preset” icon. Give the preset a name, be sure to check only the modified values and click OK.

Step 13
The next time you want to use this effect on a picture, simply open the image, go to the Camera Raw Filter, go to the Presets tab, and under “User Presets” click on the new created preset to apply it like I did in the following one.


Comments