

by Tony Thomas
January 14, 2021
Tony creates pixel-perfect UI kits & icons. His pug, Wednesday, is Medialoot's beloved mascot.


How to Add Noise to Your Vector Graphics in Illustrator
Add texture to your vector graphics by adding noise and grain to your illustrations
This tutorial will teach you how to apply a noise effect to your vector graphics in Adobe Illustrator. Adding gradin to your vector illustrations can give them more character and a grittier appearance.
Method 1: Basic Flat Noise
This is the simplest way to add noise to your vector graphics in Illustrator, a simple grain effect using two colors and a layer mask. This method is preferable if you are just looking to add a noise effect to any vector layer in Illustrator. In summary you will create two identical shapes, one for the background color and another for the grain color.
They both start off as basic vector shapes layered up together, and then a grain effect is applied as a mask to the top layer. This allows the color of the other layer to show though the grain layer mask.
Step 1
Begin by creating launching Adobe Illustrator, and creating a new document (File > New...)
- Artboards: 1
- Width: 3000 px
- Height: 2000 px

Step 2
Show the Layers window (Window > Layers) and click the Create New Layer button. On Layer 2, draw a basic shape, it can be anything you want (for a example a circle as seen below).
- Stroke Color: None
- Fill Color: #4d8885
This will be the color of the grain when the effect is applied.

Step 3
Copy (CMD+C or CTRL+C) and Paste in Place (CMD+SHIFT+V or CTRL+SHIFT+V) your shape from the Layer 2 onto Layer 1 and adjust the fill color to a slightly lighter shade.
- Stroke: None
- Fill: #61afa9
Copy (CMD+C or CTRL+C) and Paste in Place (CMD+SHIFT+V or CTRL+SHIFT+V) your shape again so that you have two copies of it on Layer 1.

Step 4
Select the shape that is on Layer 1 and go to Effect > Texture > Grain...
- Type: Grain
- Intensity: 40
- Contrast: 0
- Grain Type: Stippled
You can experiment with these settings, but these defaults work pretty well for this effect.
Hit OK when you are happy with the preview.

Select the shape that you applied the Grain effect too (remember you should still have another copy of the shape without the grain effect applied) and press CMD+X or CTRL+X to cut it to the clipboard.
Step 5
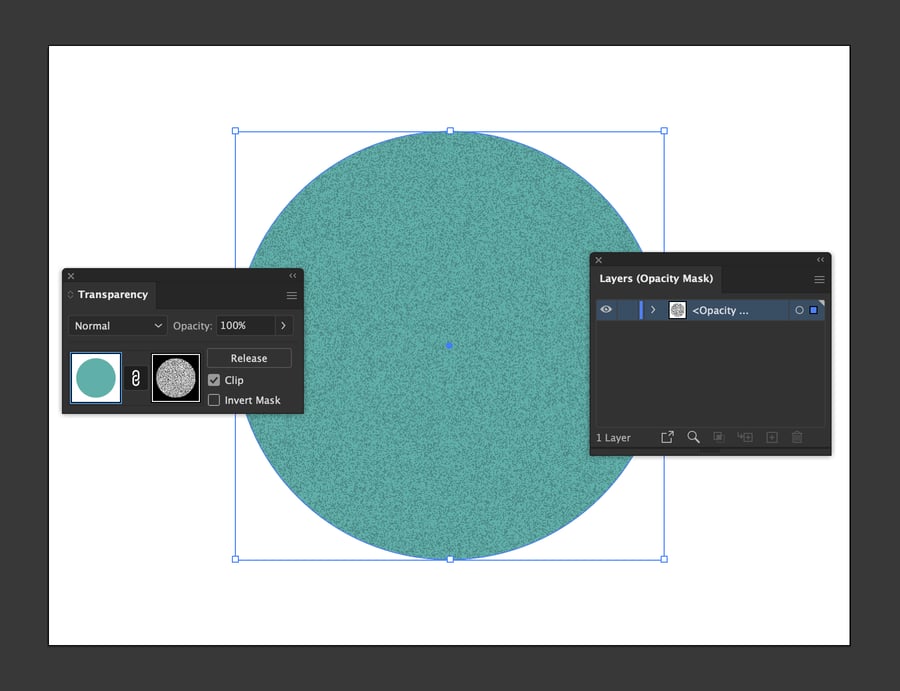
Show the Transparency Window (Window > Transparency) and make sure Show Thumbnails is selected from the dropdown menu in the top right corner of the Transparency panel.
Select the remaining shape on Layer 1 and click on the Make Mask button.
Press CMD+SHIFT+V or CTRL+SHIFT+V to paste the version of the shape with the Grain effect applied as a mask to the vector shape.

Step 6
You should now be able to see the darker vector shape from Layer 2 through the grain effect mask that you have applied to the the shape on Layer 1.

Step 7
Before you can do anything else, you need to remember to click the left hand thumbnail in the Transparency window or else you will stay in masking mode.
You now have a a grain effect effect applied to your vector shape. You can change the fill colors of either of the shapes to adjust the effect, or reduce the opacity of the shape with with the grain effect applied more subtle.
Method 2: Gradient Noise
Step 1
Next we will use a similar to method to create a shading effect by using the grain effect in Illustrator.
Just like last time, begin by creating launching Adobe Illustrator, and creating a new document (File > New...)
- Artboards: 1
- Width: 3000 px
- Height: 2000 px
Or use same document, if you are just experimenting and don't need to save the first example.
Step 2
Show the Layers window (Window > Layers) and click the Create New Layer button. On Layer 2, draw a basic shape, it can be anything you want (for a example a triangle as seen below).
- Stroke Color: None
- Fill Color: #4d8885
This will be the color of the grain when the effect is applied.

Step 3
Copy (CMD+C or CTRL+C) and Paste in Place (CMD+SHIFT+V or CTRL+SHIFT+V) your shape from the Layer 2 onto Layer 1 and adjust the fill color to a slightly lighter shade.
- Stroke: None
- Fill: #61afa9
Copy (CMD+C or CTRL+C) and Paste in Place (CMD+SHIFT+V or CTRL+SHIFT+V) your shape again so that you have two copies of it on Layer 1.

Step 4
Reset the Foreground and Background colors by pressing D on your keyboard.
Use the Gradient Tool (G) to draw a default Black to White gradient on your copy of the vector shape on Layer 1
- Type: Linear
- Angle: 90°

Step 5
With the vector shape that has a gradient fill selected, go to Effect > Texture > Grain...
- Type: Grain
- Intensity: 40
- Contrast: 0
- Grain Type: Stippled
You can experiment with these settings, but these defaults work pretty well for this effect.
Hit OK when you are happy with the preview.

Step 6
Show the Transparency Window (Window > Transparency) and make sure Show Thumbnails is selected from the dropdown menu in the top right corner of the Transparency panel.
Select the remaining shape on Layer 1 and click on the Make Mask button.
Press CMD+SHIFT+V or CTRL+SHIFT+V to paste the version of the shape with the Grain effect applied as a mask to the vector shape.

Step 7
Before you can do anything else, you need to remember to click the left hand thumbnail in the Transparency window or else you will stay in masking mode.
You now have a a grain effect effect applied to your vector shape. You can change the fill colors of either of the shapes to adjust the effect, or reduce the opacity of the shape with with the grain effect applied more subtle.

Result & Conclusion
Hopefully by following along with the tutorial you now know to howapply a noise effect to your vector graphics in Adobe Illustrator. Adding grade to your vector illustrations can give them more character and a grittier appearance.
Here is a real world example of what you can achieve with this technique...
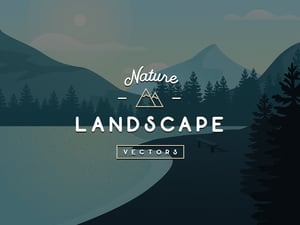
Before Adding Noise
Here is an example of a vector landscape illustration without any noise or grain effects applied. As you can see smooth, flat colors create a certain clean aesthetic.

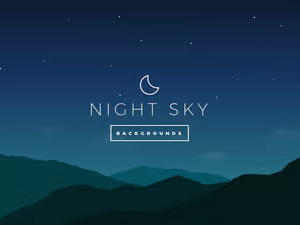
After Adding Noise
By adding some noise effects we can create a grittier image with more realistic shading and even diffuse reflections in the water from the light of the sun.

Thanks for reading, let us know if you have any thoughts of questions in the comments below!


Comments