

by Diego Sanchez
November 18, 2019
Diego prevents carpal tunnel syndrome in designers worldwide by making incredible time-saving Photoshop actions and mock-ups.
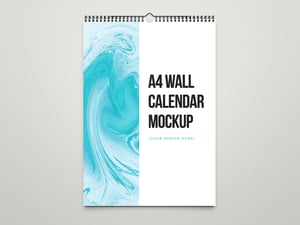


Create your own Calendar Template for 2020 Using a Script
Quick Calendars in Illustrator
When the end of the year is near, many designers around the world are ready to start receiving orders to make a calendar for the upcoming year. It seems like a difficult task doing all of the months, weeks and days one by one and arranging them to fit over a perfect grid. But there's an easy way to make it by using a simple script which allows you to focus only on the design and leave all the repetitive task of placing days perfectly aligned on a grid to the script.
Today, you will see how easy is to make a calendar template (for any year and with all the holidays marked for any country) in Illustrator by using a free script. So before we start, go ahead and download the Calendar Script: Download
Step 1
First, unzip the script package and place the script file anywhere on your computer (remember where you place it), then open Illustrator and make a new file according to the calendar size you want. In this case I will set up my document at 280 mm x 450 mm to make a single page year calendar.

Step 2
With the Rectangle Tool (M) draw a rectangle of 280 mm x 165 mm and place it at the top of the artboard as shown. This will be the space where we will place a picture or any other graphic you want.

Step 3
With the Type Tool (T) add the year right at the bottom of the rectangle using any font family, size and color that you want.
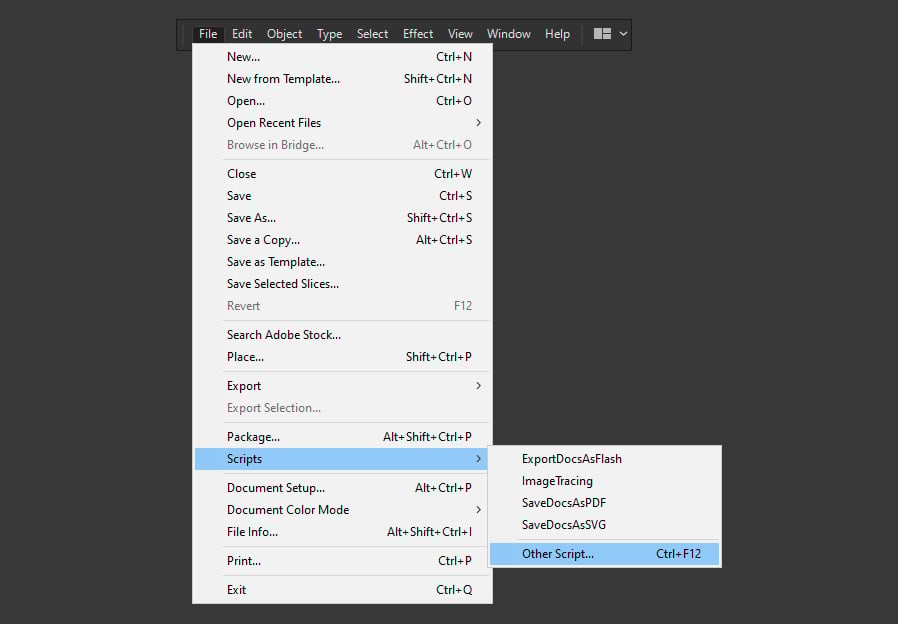
Step 4
Go to File > Scripts > Other Script. Locate the Script file on your computer and click Open.
Step 5
In the first window of the Calendar Script enter the Year for your calendar and click OK. In this case it will be 2020.

Step 6
Next, enter the names for the Months and click OK. By default all months in the English version are already placed, but if you use a different language just write the month names in order sepparated by comma.

Step 7
Now, enter the names for the Days of the Week as you want them to appear and click OK.

Step 8
Finally, enter the Holidays days (in a M/D format) you want for your calendar and click OK.

Step 9
After a few seconds, you will have a complete 2020 calendar ready to be customized.

Step 10
Go to Window > Type > Character Style.

Step 11
Double-click on the "Week Day" style and in the Character Style Options window click on "Basic Character Formats".

Step 12
Pick any Font Family you want, set the Size, Kerning, Leading, Tracking, etc and click OK. As you may see, these setting are applied to the Week Days of your calendar.

Step 13
Repeat the same process for the "Holyday", Caption of Week Day", "Caption of Weekend" and "Caption of Month" styles.

Step 14
Using the Selection Tool (V) select all Month names and align them to the left side of the week days as shown.

Step 15
As the script setup Global Colors for every element of the calendar, you can easily change the colors to your liking. In the Swatches Panel (Window > Swatches) double click on any of the Global Colors and set any color you like.

Step 16
Once you finish styling your text, using the Selection Tool (V) select the whole January month and go to Edit > Copy.

Step 17
Back in the Original "2020 Calendar Template" file go to Edit > Paste. Reposition the January month as shown.

Step 18
Following the same procedure, copy the February month, paste it on the "2020 Calendar Template" file and reposition the month as shown.

Step 19
Now simply keep adding the remaining months on the "2020 Calendar Template" file.

Step 20
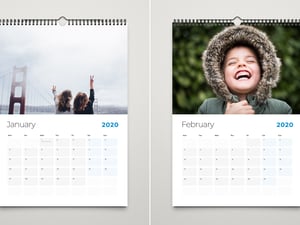
When finished, you can easily add your own photo or vector design to the calendar template, change the font family, color, size and layout to your liking like in the following examples to make your calendar unique.


Comments