
by Diego Sanchez
September 25, 2019
Diego prevents carpal tunnel syndrome in designers worldwide by making incredible time-saving Photoshop actions and mock-ups.

Add a Spray Paint Look to Your Photo
Photoshop Photo Effects
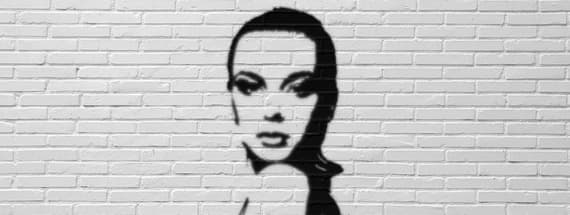
For many years Graffiti has been an indelible part of urban culture. We're used to seeing it as spiky, slapdash tagging, but there are graffiti artists who do incredibly beautiful work as well. In honor of that, today we'll show you a simple graffiti replication technique that uses a stencil to reproduce images. In Photoshop it's easy to get this effect by using a few filters and setting some layer blending modes.
Step 1
Open the image you want to convert to a spray painted one in Photoshop.

Step 2
Using your preferred method select your subject. In this case, I will use the Quick Selection Tool (W) on my subject to select it.

Step 3
With the selection active, click on the Add Layer Mask icon on the Layers Panel.
Note: your Background layer will be changed to “Layer 0”.

Step 4
Go to Layer > Smart Objects > Convert to Smart Object.

Step 5
Go to Filter > Filter Gallery. Under “Artistic”, select the “Cutout” effect, apply the following settings and click OK.

Step 6
Go to Image > Adjustments > Threshold. Adjust the levels to your liking and click OK.

Step 7
Again, go to Layer > Smart Objects > Convert to Smart Object.

Step 8
Rename the layer to “Blur”.

Step 9
Press Ctrl+J on your keyboard twice in order to duplicate the “Blur” layer 2 times.

Step 10
Name the duplicated layers as “Lighten” and “Dissolve”. Be sure to set the “Dissolve” layer at the top.

Step 11
Select the “Blur” layer and go to Filter > Blur > Gaussian Blur. Set the Radius to 5 and click OK.

Step 12
Select the “Lighten” layer and go to Filter > Blur > Gaussian Blur. Set the Radius to 3 and click OK.

Step 13
Set the “Lighten” layer blending mode to Lighten in the Layers Panel.

Step 14
Select the “Dissolve” layer. Set the blending mode to Dissolve and reduce the opacity to around 35%.

Step 15
Hold the Shift key on your keyboard and select all the visible layers.

Step 16
Press Ctrl+G on your keyboard to group them. Name this group as “Spray Paint” and set the blending mode to Multiply.

Step 17
With the main effect created, you can now make a new layer with a simple solid color fill below the “Spray Paint” layer group or go a bit further and use any wall background image for a more realistic effect.

Comments