
by Diego Sanchez
March 09, 2020
Diego prevents carpal tunnel syndrome in designers worldwide by making incredible time-saving Photoshop actions and mock-ups.

Make a Repeating Damask Pattern in 10 Easy Steps
Patterns in Illustrator
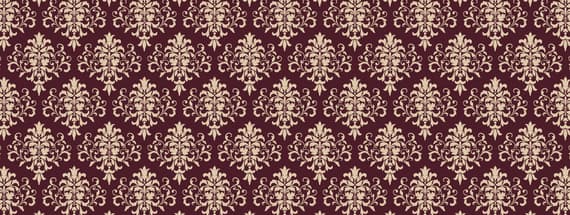
Damask Patters are very popular these days; everywhere you look (and we're talking even besides wallpapers) they're on textiles, posters, invitations and all over the internet. Patterns are an important part of any designer's toolbox. We need them for website backgrounds or even on textiles. In this tutorial, instead of showing you how to make a damask/floral design, we'll focus on how to transform your damask design into a pattern that you can use over any of your digital or printed designs.
But before we begin, and if you want to follow this tutorial exactly as described, please download the following free asset from Pixabay: Download.
Step 1
Open Illustrator and make a new file at any size you want. In this case, i will make mine at 1800 x 1200 px.

Step 2
Draw or place the damask design you want to convert to a pattern on the Artboard. In this case, we will use the free design from Pixabay as an example.

Step 3
A good idea, is to set the color of the design to a Global Color, so you can later change it without having to edit the pattern it self. To do that, go to Select > All.

Step 4
Go to Window > Swatches and double click on any preset Color. In the Swatch Options window check the "Global" option and click OK.

Step 5
With all selected, go to Object > Pattern > Make.

Step 6
In the Pattern Options window, change the Tile Type from "Grid" to "Brick by Row".

Step 7
Click on the Pattern Tile Tool icon and increase the Horizontal space at the same time that you decrease the Vertical spacing by dragging the top right anchor point as shown.

Step 8
Once you are happy with the spacing simply click "Done" in the top toolbar.

Step 9
With the Pattern created, it is time to test it. Delete all the elements on your artboard and make a rectangle (or any other shape) covering the whole Artboard.

Step 10
With the rectangle selected, open the Swatches Panel (Window > Swatches) and set the fill to our recently created Damask Pattern.

Easily Changing the Color
If later you decide that you want your damask design on a different color, be sure to have nothing selected and double click on the Global Color we set earlier in the Swatches window. Then in the Swatch Options window set any color you want and click OK.


Comments