

by Diego Sanchez
October 16, 2019
Diego prevents carpal tunnel syndrome in designers worldwide by making incredible time-saving Photoshop actions and mock-ups.

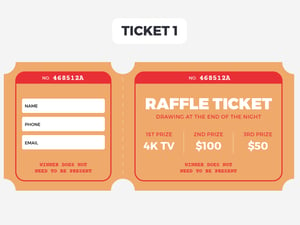
How to Make a Realistic Looking Raffle Ticket
Textures & Styles in Photoshop
If on your next event you are planning to set up a raffle and you want to promote it in an attractive way, then this tutorial is for you. In this tutorial, you will learn how to create a realistic looking raffle ticket from scratch in Photoshop using nothing more than a single texture, some default Photoshop tools and a few layer styles.
But before we start, and if you want to follow this tutorial as described, please download the following free texture from Pixabay: Download.
Step 1
Make a new Photoshop document at any size you want. In this case, I will be using a 1800 x 1200 px canvas.

Step 2
Select the Pen Tool (P). Be sure to have the mode set to "Shape" in the top toolbar and roughly draw a ticket shape like the following one.

Step 3
Rename this layer to "Ticket Shape". Double click on the ticket shape layer thumbnail and set the main color to #ed6565.

Step 4
Select the Rounded Rectangle Tool (U) and draw a rectangle inside the main ticket shape as follows. Rename this layer to "Frame".

Step 5
With the "Frame" layer selected, got to Layer > Layer Style > Blending Options. Under "Advanced Blending", set the Fill Opacity to 0%.

Step 6
Check the Inner Shadow effect and set the following values.

Step 7
Check the Drop Shadow effect, set the following values and click OK.

Step 8
Select the Pen Tool (P). In the top toolbar, set the Fill to "No Color", the Stroke to "Solid Color", be sure to have the size set to 1px and draw a single line from the top to the bottom of the rounded rectangle as shown. Rename this layer to "Line".

Step 9
In the Layers Panel, right click over the "Frame" layer and select "Copy Layer Style" from the dropdown menu.

Step 10
Select the "Line" layer. Again, right click over it and from the dropdown menu select "Paste Layer Style".

Step 11
Select the Horizontal Type Tool (T) and using any font at any size you want type your main ticket text.

Step 12
With the Horizontal Type Tool (T) still active, type the ticket number.

Step 13
With the ticket number layer selected, go to Layer > Layer Style > Blending Options. Under "General Blending", set the Blend Mode to Multiply and the Opacity to 90%.

Step 14
Check the Bevel & Emboss effect and set the following values.

Step 15
Check the Inner Shadow effect, set the following values and click OK.

Step 16
Select the main ticket text layer (in this case "TICKET") and go to Layer > Smart Objects > Convert to Smart Object.

Step 17
Go to Layer > Layer Style > Blending Options. Under "General Blending", set the Blend Mode to Multiply and the Opacity to 90%.

Step 18
Check the Pattern Overlay effect. From the pattern thumbnail select the "Wrinkles" pattern, apply the following settings and click OK. Note: If you do not have it visible, click on the top gear icon in the thumbnail window and select "Patterns" from the dropdown menu.

Step 19
Go to Filter > Distort > Ripple. Apply the following values and click OK.

Step 20
Go to Filter > Noise > Median. Apply the following values and click OK.

Step 21
Again, go to Filter > Distort > Ripple. Apply the following values and click OK.

Step 22
Go to Filter > Sharpen > Unsharp Mask. Apply the following values and click OK.

Step 23
Open the Cardboard texture in Photoshop and go to Image > Adjustments > Desaturate.

Step 24
Go to Image > Adjustments > Levels. Apply the following values and click OK.

Step 25
Go to Layer > Duplicate Layer. Rename it to "Texture", under "Destination" select the "Raffle Ticket" document and click OK. You may close the Cardboard texture file.

Step 26
Back in the Raffle Ticket file, be sure to have the "Texture" layer selected and go to Layer > Duplicate Layer. Name this layer as "Texture 2" and click OK.

Step 27
Drag the "Texture 2" layer on top of the "Ticket Shape" layer and then go to Layer > Create Clipping Mask.

Step 28
In the Layers Panel, change the Blending Mode of the "Texture 2" layer to Multiply.

Step 29
Now select the "Texture" layer and in the Layers Panel change the Blending Mode to Screen and set the Opacity to 15%.

Step 30
With the "Texture" layer still selected, go to Layer > Create Clipping Mask.

Step 31
Select the "Ticket Shape" layer and go to Layer > Layer Style > Bevel & Emboss and set the following values.

Step 32
To finish our Raffle Ticket, check the Drop Shadow effect in the Layer Style window, apply the following settings and click OK.


Comments